

How To Set Up Community Wifi
It's probably the most common question when installing your first Raspberry Pi, so I choose to write a guide about it to help you find the good solution in your specific case.
All recent Raspberry Pi models (Pi 3, 4/400 and Zero W) include a wireless connection, but the configuration is not always easy, especially with a complex or secured network, or on Raspberry Pi OS Lite.
I will answer all your questions in this post.
Here are the steps to configure the Wi-Fi network on a Raspberry Pi:
- Open a terminal
- Type the following command to open the configuration tool:
sudo raspi-config - Go to Network Options > Wi-Fi
- Follow the wizard to choose a SSID and enter the password.
I'll show you everything in this post. There are several solutions available, depending on your system version and access to it.
By the way, if you are really interested in improving your skills on Raspberry Pi, I highly recommend to check out my e-book here.It's a 30-days challenge from beginner to master, with step-by-step tutorials and many projects to practice along the way.
Raspberry Pi Wi-Fi Headless Configuration
Download the Pi Glossary!
If you are lost in all these new words and abbreviations, request my free Raspberry Pi glossary here (PDF format)!
I call this part "headless" because it's the way you can use if you don't have a screen on your Raspberry Pi.
But you can absolutely use it in any case. Besides, that's what I do most of the time.
Method
This solution applies if you just flashed your SD card, and want to enable Wi-Fi on your fresh system on the first boot (but it also works for an old SD card you used with Ethernet or an old wireless network).
You have a file to create and copy on the SD card, so on the next boot, Raspberry Pi OS will read the file and apply the configuration directly.
You don't have anything else to do.
Good idea no?
wpa_supplicant.conf
Raspberry Pi Bootcamp
Sale: 10% off today.
Take it to the next level.
I'm here to help you get started on Raspberry Pi.
Learn all the skills you need in the correct order.
Let's see how to do this:
- Open your favorite text editor on your computer.
The basic editor from your operating system will be fine (Notepad for example). - Copy and paste these lines into it:
country=US ctrl_interface=DIR=/var/run/wpa_supplicant GROUP=netdev update_config=1 network={ ssid="YOURSSID" scan_ssid=1 psk="YOURPASSWORD" key_mgmt=WPA-PSK } - Replace variables with your SSID and password, and change the country value if needed.
- Save the file on a location you can find easily the next time you create a new SD card.
Insert your SD card into your computer (for a fresh new SD card created with Etcher, you have to eject and insert it again).
Then copy the wpa_supplicant.conf file to the boot partition.
It works with any Raspberry Pi OS version (Desktop or Lite).
So, it's perfect for any use.
Enable SSH automatically
Another thing you may want to add, if you really use your Raspberry Pi without screen, is to enable the SSH service automatically.
On RPI OS, it's not the case by default. Even if your Pi connects to your wireless network, SSH will not be enabled.
To do this, there is another file to create.
Just create an empty file, named "ssh" into the same partition (boot).
It's enough to tell Raspberry Pi OS to start the SSH service automatically on boot.
It's something I use all the time, as explained in this tutorial on how to install a Raspberry Pi without screen and keyboard.
Configure Wi-Fi on Raspberry Pi OS Desktop
Let's see now how to configure your Wi-Fi once you're on Raspberry Pi OS with Desktop.
Welcome wizard
If it's your first boot, you should get a "Welcome to Raspberry Pi" message, asking you to set up your system.
It's the easiest way to do on Raspberry Pi OS with Desktop, don't miss this menu.
After setting the country and password, you'll get a window like this:
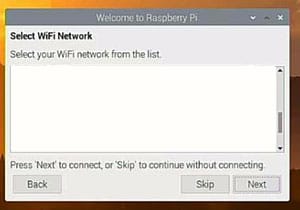
Select your Wi-Fi network SSID in the list, and type the password.
A few seconds later, you'll be connected to your network.
Task bar
If you missed the welcome wizard, or skipped the Wi-Fi configuration here, you can do it or change it at anytime in the taskbar panel
- On the top you have the main panel, with the menu, shortcuts and the clock.
- Near the clock, there is a network symbol (with two red crosses if you are disconnected).
- Click on it, a list of all available wireless networks appears.
- Select your network in the list, and type your password.
Master your Raspberry Pi in 30 days
Sale: 10% off today.
Download the eBook.
Uncover the secrets of the Raspberry Pi in a 30 days challenge.
Learn useful Linux skills and practice multiples projects.
That's it, not very complicated either 🙂
Set up your Wi-Fi on Raspberry Pi OS Lite
If you're on Raspberry Pi OS Lite, you may need more help to find how to configure your network.
Let's see how to do this.
Raspi-config tool
The Raspberry Pi Foundation thought of you.
Even you are on a black and white screen for pro, there is a tool to help you to configure your wireless network easily.
This tool is raspi-config, available by default on Raspberry Pi OS Lite:
- Start raspi-config with:
sudo raspi-config
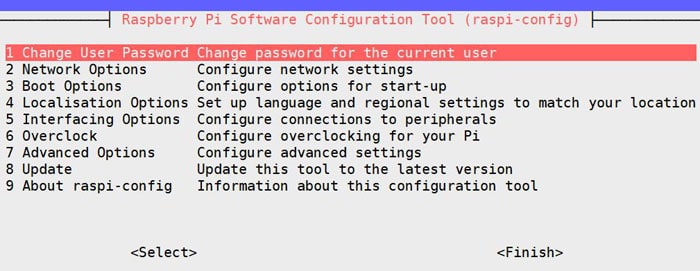
- Go into Network Options > Wi-Fi.
- Type your SSID and your password.
- Exit the tool.
After a few seconds, your Pi is now connected to the wireless network you chose.
That's an easy way to do on Raspberry Pi OS Lite.
Manual configuration
The last option is not easy, but only useful for specific network I think
In fact, I'm not sure when manual configuration is the only option.
Maybe on a big network with secure authentication, a critical device or static network?
Anyway, here is how to create a manual configuration, even if it's just for your curiosity 🙂
WPA Supplicant
The wireless configuration on the Raspberry Pi is located in /etc/wpa_supplicant.
You can edit the configuration file with nano:
sudo nano /etc/wpa_supplicant/wpa_supplicant.conf
The syntax is the same as we saw in the first part, with the file you can put on your SD card.
You'll find here the same information, so you can change them directly in this file if needed.
Here is a reminder of a basic configuration syntax with WPA-PSK:
country=US ctrl_interface=DIR=/var/run/wpa_supplicant GROUP=netdev update_config=1 network={ ssid="YOURSSID" scan_ssid=1 psk="YOURPASSWORD" key_mgmt=WPA-PSK } If the new configuration doesn't apply after a few minutes, you may need to reboot the Raspberry Pi:
sudo reboot
Master Python on Raspberry Pi
Sale: 10% off today.
Get the eBook.
Do more with your Raspberry Pi, learn the useful concepts and take the shortcuts.
You miss half of the fun of using a Raspberry Pi if you don't know anything about Python.
You can find many examples here to adapt the configuration to your network (if you use WEP, EAP or any other security options).
A bit lost in the Linux command line? Check this article first, which will give you the most important commands to remember, and a free downloadable cheat sheet so you can have the commands at your fingertips.
Network configuration
Finally, if you need a static IP on your network, the interface configuration can be done in dhcpcd.conf:
- Open the file:
sudo nano /etc/dhcpcd.conf - Find the "Example static IP configuration" paragraph.
- Uncomment every line you need (probably ip_address, routers and domaine_name_servers), and change the values to adapt to your network.
- Here is a basic example:
interface wlan0 static ip_address=192.168.1.10/24 static routers=192.168.1.1 static domain_name_servers=8.8.8.8
Save and exit, then reboot the Raspberry Pi:
sudo reboot
More details about this here.
Conclusion
Get My Cheat Sheet!
Grab your free PDF file with all the commands you need to know on Raspberry Pi!
That's it, you know everything you need to set up the Wi-Fi on your Raspberry Pi, whatever your network.
I hope this post was helpful.
As a general rule, it's easy when you know what to do, but maybe I've never been in a situation where configuring Wi-Fi on the Raspberry Pi was complicated 🙂
Support us: Join the community on Patreon to show your support, get behind-the-scenes content and other awesome perks!
Raspberry Pi Resources
Not sure where to start?
Understand everything about the Raspberry Pi, stop searching for help all the time, and finally enjoy completing your projects.
Watch the Raspberry Pi Bootcamp course now
Master your Raspberry Pi in 30 days
Don't want the basic stuff only? If you are looking for the best tips to become an expert on Raspberry Pi, this book is for you. Learn useful Linux skills and practice multiple projects with step-by-step guides.
Download the e-book
VIP Community
If you just want to hang out with me and show your support, you can also join the Patreon community. I share behind-the-scenes content there and give you early access to my content. You'll also get a shoutout when you join.
More details here
Need help to build something with Python?
Create, understand and improve any Python script for your Raspberry Pi.
Learn the essentials, step-by-step, without losing time understanding useless concepts.
Get the e-book now
You can also find all my recommendations for tools and hardware on this page.
How To Set Up Community Wifi
Source: https://raspberrytips.com/raspberry-pi-wifi-setup/
Posted by: felderpervage73.blogspot.com
0 Response to "How To Set Up Community Wifi"
Post a Comment